Hiya Guys,
I thought I would help those that really want to learn how to make tags, by making tutorials for you guys. :) This one is just a basic how to, to start off with, and if there is continued interest, I will make an advanced version when I have time. :)
__________________________________________________________
~*~ The Basics ~*~ __________________________________________________________
Things you will need: A graphics program to draw/organize with
I think most computers come with MSPaint. This program is the easiest to use and it is also really good to use for tags, as you can choose the amount of colors going into the tag. Even if you do not use MSpaint for the drawing part, it is really easy to use to organize your frames.
Other programs you can also use: Photoshop (any version) Paint Shop Pro (any version) or any other program that you can draw in and also be able to size down images with. :)
Next you will need an animating program.
Animagic to me is the best animator that I have used, for the simple reason that a good portion of animating programs take colors out instead of replacing them. This will be key in making a tag look better and not having disappearing pixels on graphics. The way you know if you have an animator that takes out colors is when you optimize in that program and click the play button, then the graphic looks like it is literally disintergrating (or falling apart- as it deletes those pixels)
*You can download animagic through the tag site under the look up tags tab.. just scroll down and there will be a link and also another good tutorial too. :)
Other programs though, if you do know how to use them where they will replace the color pixels, works just fine. I also have the animator that comes with Photoshop, but I barely use it, because when I save in .gif form it makes it look like there are dots all over the animation. :)
__________________________________________________________
Okies, now that we have our programs set. I am going to tell you how I personally make tags. I do not size down images that I get on the net. Every single one of my graphics (from my recollection) is all hand drawn with a mouse. It's very strategic and over time, practice doing this, can actually make it easier to fit a graphic into the tag allotted size and byte space.
The reason I draw all mine, is because when you do take an image, even if it is small, and try to size it down to the alloted 14 pixel hieght size, the colors go all wonky in it, or it just becomes a blurry blob. When drawing them, you can get better clarity in the picture and make your graphic work better in the tag or animation.
I spend on average, about 10 hours on a single tag.. Only an hour or 2 is actually spent on the drawing, the other half is getting it to fit the byte requirement of 1,000 bytes.
If you choose though, to find an image and change it, making it smaller, and it works, there is no shame in that. :)
__________________________________________________________
In this next part, I am going to explain how I set up a tag.
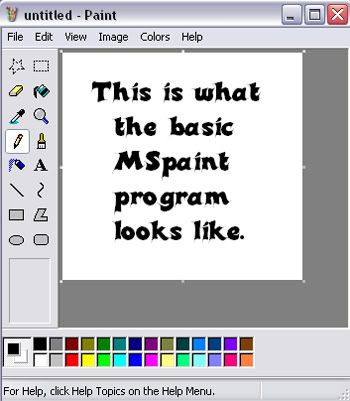
First, I open my paint program..
Shown here:
Then I open my general tag making base
-To make a general tag making base... Click on "Image", then on "Attributes" at the top.. Notice the Width, and the Height spaces.
Shown here:
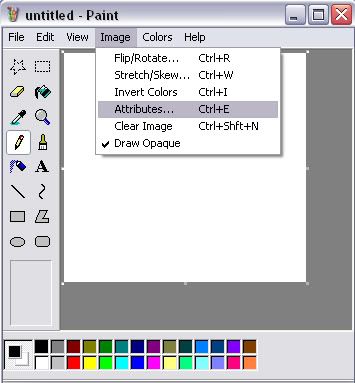
Change the numbers to Width: 100 and Height: 14 ....
Shown here:
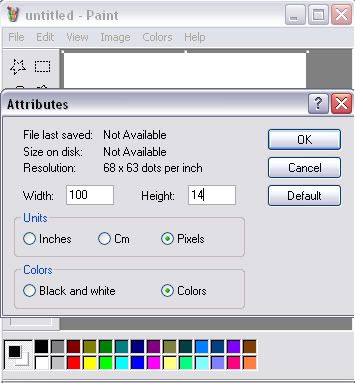
-After doing this, then your paint should look like a tiny rectangle. You can use the magnifying glass to the side to zoom in if you feel the need to, or for when you are drawing/organizing. (which will be explained later). *NOTE*: In this step, I always take the "Paint bucket" to the side, and then click the black square at the bottome. After that, I take my cursor and click on the white rectangle, making it have a black background.
Then I go back up to "Image", click "Attributes" again, and make the Height 15 pixels... After changing the height, I take my dark teal color, and fill in the 1 pixel high white strip (using the paint bucket again) to make it a dark line, but also as a guide/grid for my tag base.
Once you do that, use the "Dotted line box" at the top right of your tool box to the left and go up to "Edit", then click on "Select all". Go back to "Edit" and then click on "Copy".Go back to "Image", click on Attributes again, and change the Height once again, but this time make 200pixels. Then go back to "Edit" once again and click on "Paste".. Now here comes the tricky part for some people.. Put your cursor on the pasted frame and left click it and drag it with your mouse directly under the first frame. Repeat this process to form the amount of frames that you think you will need for the tag you are making.
__________________________________________________________
This is my way of making a frame grid. I am sure others do this differently, but this is what makes it easier for me to see what I am doing all on one page.
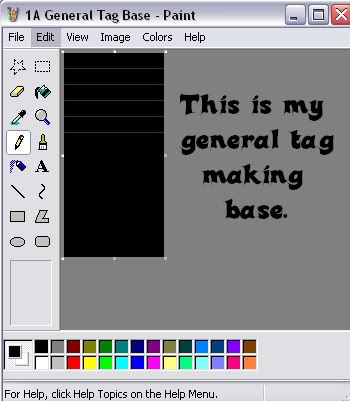
If you look at my grid, I have very faint/dark (because I have bad eyes, bright on dark in this way really makes them hurt) teal lines going through the black. These section off my frames and make it easier for me to know what I am working with.
Shown here in zoom:
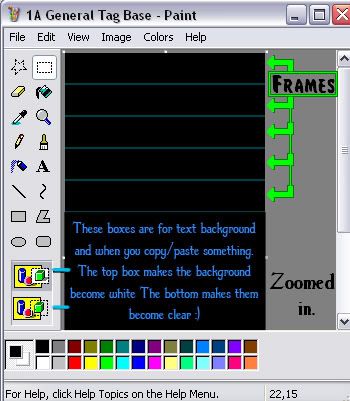
You will also see underneath the five allotted 14 hieght by 100 width frames that I have made a grid for, then there is a pretty large space of just black. This is where I take the oppurtunity to draw or make my animation. It also makes it easier. However, I must mention, that I usually draw in my photoshopCS and then make the image smaller, then copy/paste it into MSpaint, and that is where I fix (eliminate) colors so that there are not too many. (Too many colors = too big of a tag)
This is also where I do my animating graphics. I draw a base graphic only in my photoshop cs.
__________________________________________________________
Next I am going to show a very simple drawing to explain how to do animation using this system.
Let's try animating a ball... :) (I will do this in the zoomed version of my tag making base so that it is easier to see :)
First I click the Paint brush and then select the largest Round circle
Shown here:
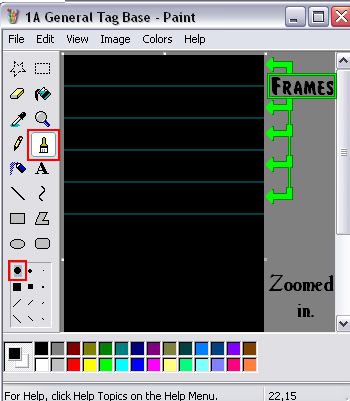
Then, make a ball like this (it doesn't have to be perfect :) This is just an example of animation :) )
Shown here:
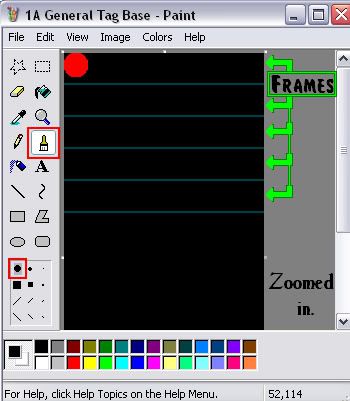
Then, click the dotted box at the top left, that is now in shown in the red box...
Shown here:
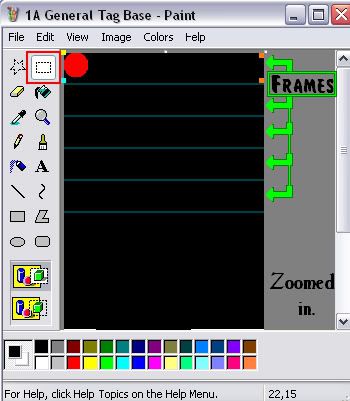
After you do that take your curser (mouse) and go to the top left where the yellow dot I have placed.
Left click on the dot, and then move the line down to the clear blue color.
Then drag it (still holding the button down) to the orange dots on both sides.
If you have done this correctly, it will have a dotted line all the way across the first frame, and above the dark teal line seperating the two.
Once you have done this and checked to see if it is correct, right click and select COPY.
Shown here:
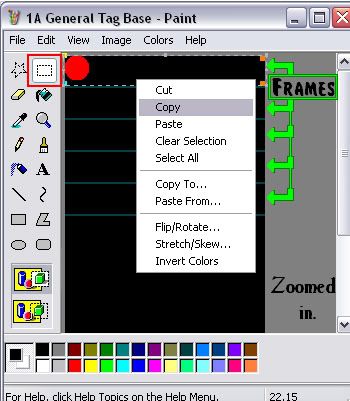
Then click paste.. and move the frame down into the middle of the next teal lines... :) (You also use this feature to move graphics too, which will make it easier in the respect that you won't have to redraw each graphic *which is a ball in this example* )
Shown here:
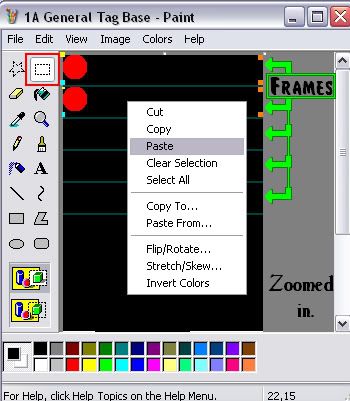
Now that you know this part... you just do this over and over, for each frame, choosing the frame before it to copy so that you can do the right animaton in order.
Shown here:
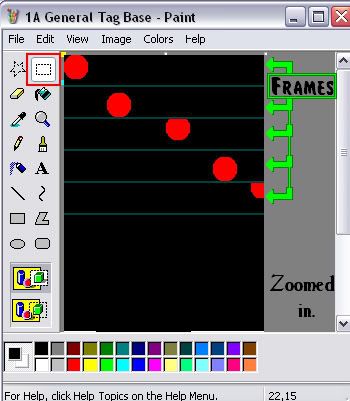
__________________________________________________________
As you see the ball from start (first frame) to the end (last frame) it just looks like it's been moved around, but when you animate these frames by copying and pasting them (remember to copy inbetween the grid lines, dont copy them with the frame) into animagic.
Do not copy the first frame down, into animagic though.(So instead of going in order of Frame 1,2,3,4,5 down)
Copy from last frame first and paste them in this order: (5,4,3,2,1up) That way you get them in the correct order in animagic. :)
These steps are shown here:
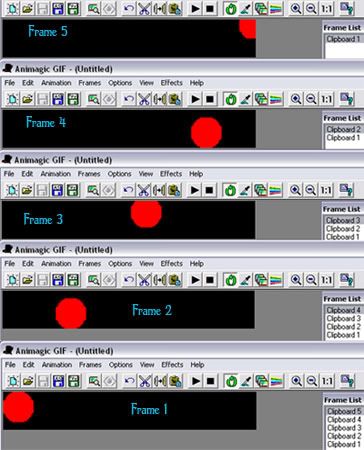
You get this:

__________________________________________________________
To see it animated there is a Play button and a stop button at the top.
Now that you see the animation you have to check the byte size.. remember all tags should be at or around 1,000 bytes.
This is what our ball is at right now, after saving it without optimizing it:

So already you see, it is a bit big without the optimization. To save as optimized, go to file, then save optimized.
Once you do that, this is how small it is:

When you do that the byte size will go down, because the animator singles out just the pixels that have changed.
The less that you change in each frame that you add the more the optimization will be. If you look at the tag after optimizing it, you will see that it has saved in sections like this:

*Note* This is very important when making tags, the more practice that you get at animating and figuring out how to do it well. You can work your way up to different things. :) Also, the fewer colors you have in a tag, the more it will optimize too. :)
Also, if your tag is moving too fast or too slow, you can go to "Animation" and then click on "Frame Rate"... This is best explained by playing with the numbers, as trying to explain this would be very confusing. :)
__________________________________________________________
And this concludes my Basics on making tags.. I will be working on the next part, where taking and sizing images will be explained and also will touch more on colors/pixels and how to include fonts well. :) I think this is a good start though with working with the graphics.
Also, Remember have fun with it. Practice, practice, practice, and as long as you have fun with it, there are no failures. :)
I hope that my tutorial has been easy to understand. If there are any questions or suggestions for the next one I make, I'd love to hear them :D *note* Ginger gave me permission to put these many pictures up, normally only 7 is allowed. :)
*huge huge hugs*You can join Unsolved Mysteries and post your own mysteries or
interesting stories for the world to read and respond to Click hereScroll all the way down to read replies.Show all stories by Author:  28190 ( Click here ) 28190 ( Click here )
Halloween is Right around the corner.. .
|


 God Bless


 But thank you. I tried my best to make it as easy to understand, and informative as well.
  I hope it helps those that are wanting to learn how to make tags (or just animations).
  *hugs*


 Yeppers, this could be applied to anything. Especially if you have your own website and want custom graphics. You can't beat custom made graphics for your own website or just doodling. They are loads of fun, so I hope you and your children enjoy! hehe *Hugs*
 I hope that I can get my thoughts together well for the next one I make, that will explain the fonts and more detailed pieces. Overall, I hope that it makes learning how to make tags easier, and even may help the other tag makers on the site to cut their time down a little on the time they spend making tags
  hehe.. *hugs*


 x 10000


 I was hoping it would be received well
  And I hope it helps others.
  *hugs you all*


 I'm glad to be of some help.
  *hugs*